For my chapter, I chose to study the diffusion of Buddhist art throughout Asia. My selected images clearly show how Buddhist traditions were reinterpreted by several different cultures. Buddhism is unusual because it became popular in foreign countries, yet virtually died out in the place where it originated. Before this took place, Buddhism had been intimately linked to the geography of India. Earlier Buddhist art often resembled Hindu art, due to their shared identity as Indian religious/philosophical art. Yet later examples of Buddhist art adapted local traditions, to the point where depictions of the same figures ended up looking drastically different. Ultimately, Buddhist art and its depictions of holy men evolved significantly as it spread throughout Central Asia, China, and Tibet from the 8th to the 14th centuries.
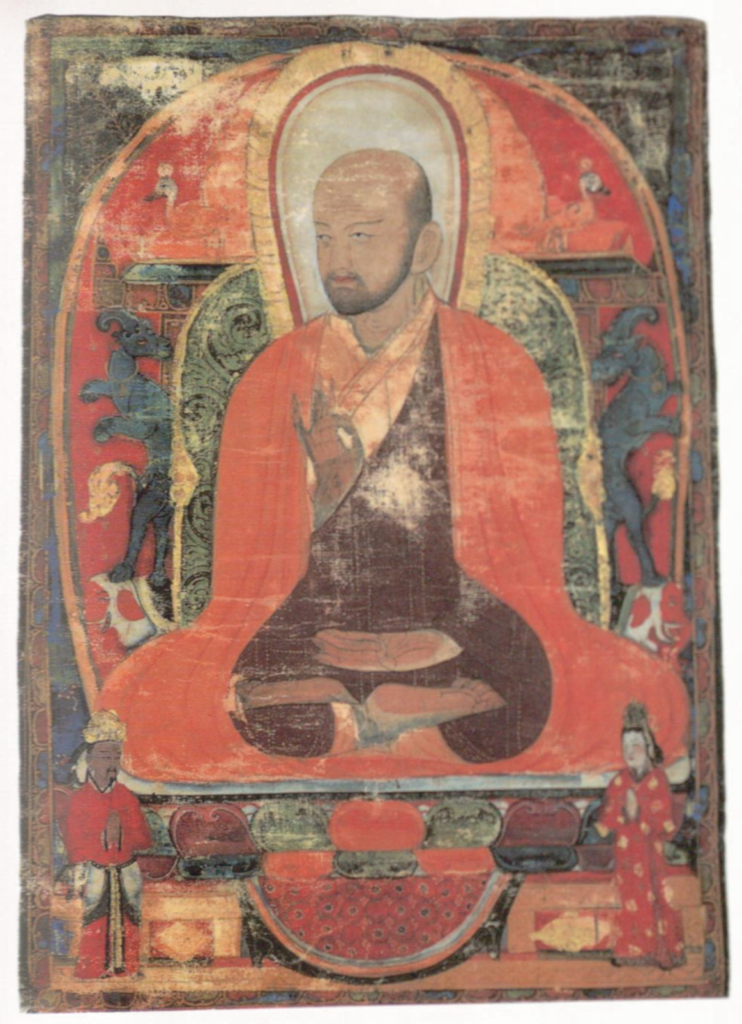
The beginnings of this trend can be seen in fig. 1, which was found in what today is Inner Mongolia. This Tibetan painting shows a figure seated cross legged in what is clearly an Indian position, although the face is rendered in a distinctly central Asian style. The painting’s melting pot of features includes several central Tibetan motifs rendered provincially (i.e., not by Tibetans). Thus, this appears to be evidence of Tibetan styles spreading to foreign countries. Because new converts accepted Tibetan Buddhist art as done in a Buddhist style, Buddhism’s central identity began to drift away from India.
Nevertheless, fig. 1 does retain some distinctly Indian motifs. For example, the two horned animals and birds flanking the central figure were initially associated with east India. The style then spread with Buddhism to the Tibetans, the Tanguts in inner Mongolia, and the Chinese. Additionally, the decorative floral design flanking the throne was also originally Indian. It contributes to the painting’s extreme multitude of colors and painstaking detail. In fact, fig. 1 is almost reminiscent of densely decorated Hindu temple walls. After all, the inclusion of flanking motifs does provide some symmetry, but it also detracts from the realism. The two tiny human figures standing in the bottom corners also play into this. Their presence emphasizes the central figure’s holiness, at the expense of the painting’s realism. Thus, the subject’s holiness gains emphasis from the unreality of his environment.
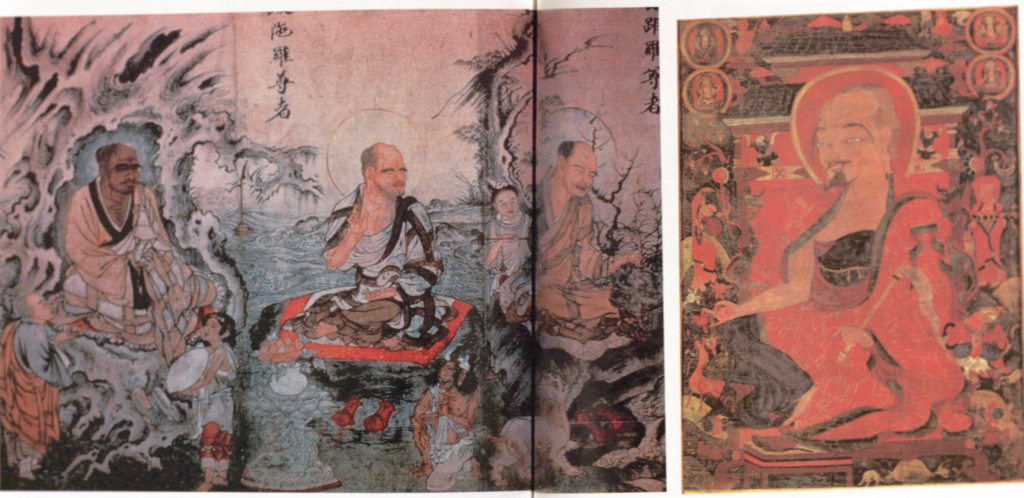
fig. 3 (right): Portrait of the arhat Vanavasin, late 14th century, central Tibet (Fisher, pg. 157).
This also appears in fig. 3, which similarly depicts a holy man. The significantly different setting of fig. 2 shows how Buddhist themes varied in art from other cultures (the landscape is Chinese, while the right is Tibetan).
Just like in fig. 1, fig. 3 is entirely focused on the holy man, who takes up most of the space. He also appears to be flanked by smaller human figures, just like in fig. 1. The tiled roof with brackets behind him is an extremely Chinese style, although the four floating seated figures in circles flanking it could almost be Hindu. The artist used very thin outlines, reminiscent of later Zen styles from Japan. However, in fig. 3 this is paired with the same lavish closeup work as in fig. 1. As a result, it can be difficult to make out the details on some of the smaller elements. This clumsiness suggests that the style was experimental, and something of a break from earlier artistic traditions.
An even bigger innovation appears in fig. 2, which depicts several seated holy men. By necessity, the painting is not entirely focused on any one figure. However, the artist has taken advantage of these deemphasized human figures to set his tableaux in an unmistakably Chinese landscape. He has taken time to individually render rocks and trees, often with very dark colors to add emphasis. The landscape is mostly rendered in black and white, just as later Japanese Zen paintings would be. However, the figures are painted in color, in a style that closely resembles fig. 1. This aptly illustrates the cultural divide between the two painting styles.
It can also be seen by considering the word choices made to describe the subjects. While fig. 2 describes someone who has attained enlightenment but not yet reached nirvana as a Lohan, fig. 3 uses the word Arhat (Arhat is the Sanskrit term, while Lohan is a Chinese word).
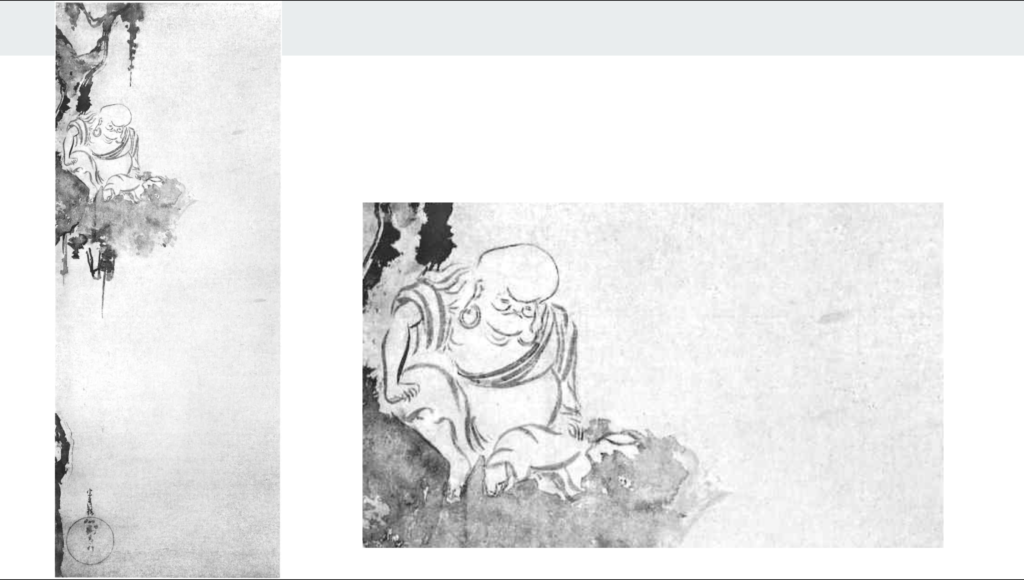
Fig. 4 (detail: close up of the priest) was painted by Japanese artist Tawaraya Sotatsu, who was heavily influenced by an older Chinese painting of the same subject. However, the original made a point of depicting the entire tree. Sotatsu rejected this example, and only included half of the tree. This results in the right half of the painting being mostly open space, which contrasts with the more densely painted examples of Buddhist art seen above. This conveys how important emptiness was to Buddhists, as they believed it created the mental space necessary to think and meditate. Japanese artists like Sotatsu differed from the preexisting traditions of Buddhist art by striving to capture this in their work. Nevertheless, Sotatsu did incorporate some features of earlier Buddhist art. Most notably, Choka does appear to be sitting in the same cross-legged position as Hindu and Buddhist deities. However, Sotatsu also differed from his inspiration by rendering the monk with pale ink lines. This reduces his impact and ensures that his figure blends into the natural surroundings.
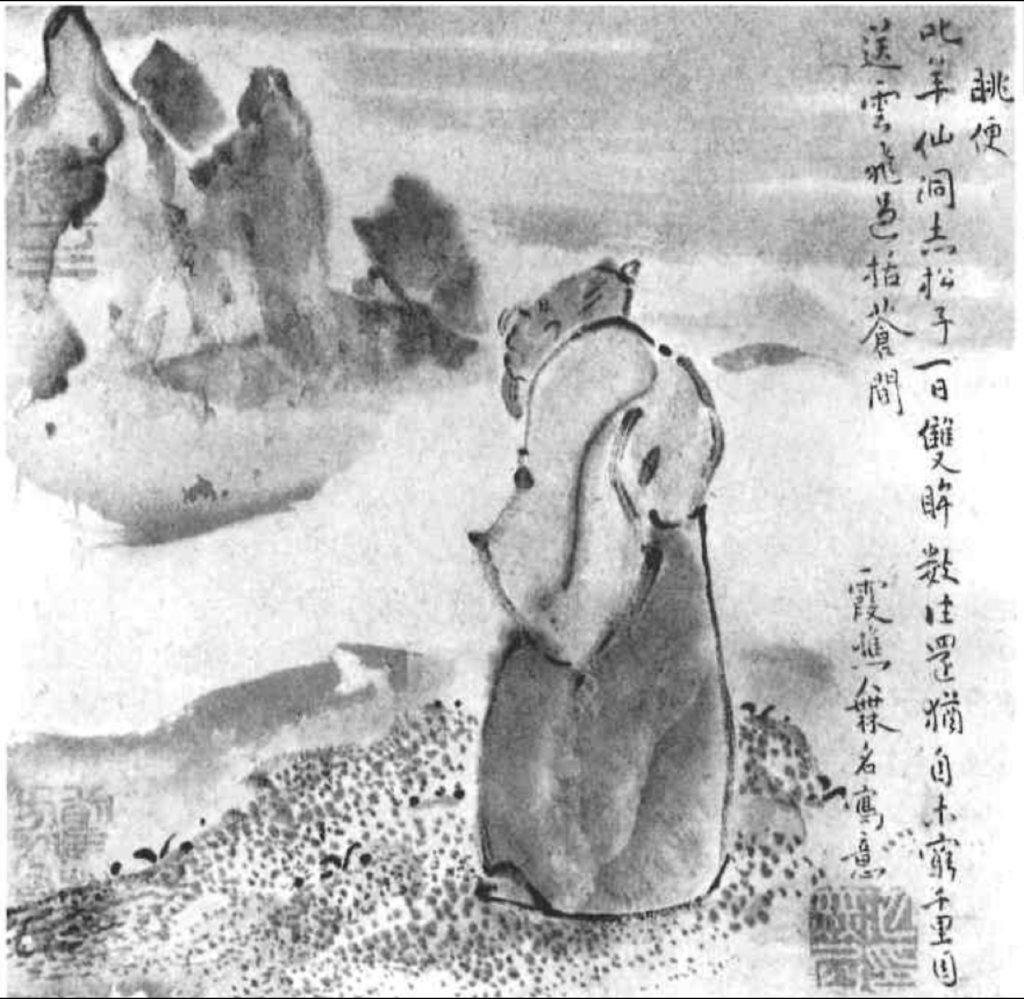
Fig. 5 shows an example of Japanese nanga style painting by Ike no Taiga (1723-1776). Often this style depicts exaggerated interpretations of wen ren paintings from China. This example shows their tendency to add a lighthearted sense of humor not present in the source material. In this case, Taiga has painted the scholar and the mountain to look vaguely similar. This was meant to make us smile, but the plain looking figure is also meant to convey a moral message. His homely and unassuming exterior contrasts with his pure and enlightened heart, as he is a parallel to earlier representations of Lohans and Arhats. However, the holy man’s submission to nature represents a distinct break from the earlier traditions. If earlier Arhats were depicted submitting to anything, it would have been higher ranked Buddhist beings, like bodhisattvas or The Buddha.
Thus, fig. 5 shows a humbler holy man, whose simplicity is emphasized with a simplified style and soft ink tones. Taiga renders the immediate foreground with a brush-dotted texture, which contrasts nicely with the rest of the painting’s smoother surfaces. It blends well with the painting’s more detailed style; for while there still is a significant amount of open space, there are significantly more background colors than in fig. 4.
This scene is almost the exact opposite of fig. 1. Instead of facing us and filling most of the space, this scholar is turned away and appears smaller. While fig. 1 had smaller human figures to demonstrate the central figure’s holiness, in this image it is the holy man who is dwarfed by the mountain. This does tie into Zen Buddhism’s focus on nature, as seen in fig. 4. The image does portray nature as a source of enlightenment and strength to holy men, but it does so using a realistic setting. This is a far cry from fig. 1, whose tiny disciples and giant holy man seem completely separated from ordinary life. Instead, they seem to play the same role as a mandala: communicating the connections and relationships between the figures.
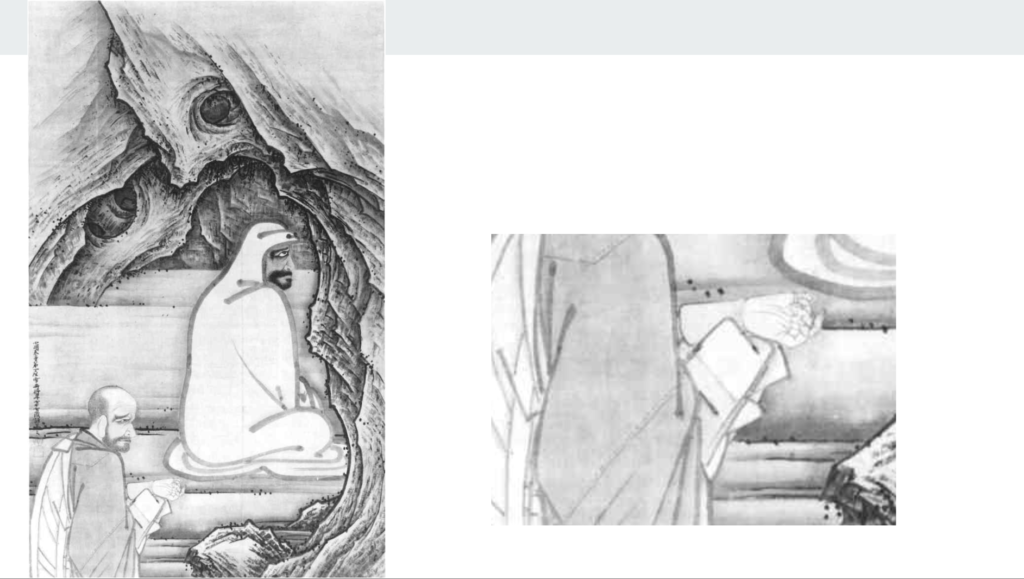
Fig. 6 (includes a detail of the figures) is a gruesome painting depicting the important Zen holy man Daruma, and his follower Eka offering up his own severed hand. Notably, Daruma appears to be sitting in the cross-legged position seen in earlier, Indian influenced art. However, he is facing away from the viewer quite deliberately, which is quite different from the way this position is depicted in fig. 1-4. This partly encourages us to see Daruma as situated in a 3D environment, rather than the painted equivalent of a niche which faces only one direction. Toyo’s commitment to realism is also supported by making Daruma (the holy man) and Eka (his supplicant) approximately the same size. Of course, he has emphasized Daruma’s importance and height by placing him significantly more elevated than Eka, as well as closer to the center of the painting. These stylistic choices mirror those made by the artists who painted fig. 1 and 3 but do so without violating the painting’s sense of reality.
This is essential for the depiction of such a gory scene, where Eka has chopped off his own hand to prove to Daruma that he is worthy of being his disciple. Historical records tell us that Daruma himself was not above self-mutilation, as he supposedly cut off his own eyelids to avoid falling asleep during meditation. Notably, Toyo has chosen to place Daruma at the entrance to a cave, so this dark scene is rendered in literally darker coloring. This continues Toyo’s use of heavy-handed symbolism justified through the picture’s internal logic.
As I looked at the evolution of Buddhist images, I found that two semi distinct categories tended to emerge. It seems to me that earlier artwork located geographically closer to India is often aesthetically like Hindu art, while later paintings from Japan feature a more minimalistic Zen style.
Many of these more “Indian” paintings (fig. 1 and 3) depicted a holy man seated. It is hard to tell where, for while fig. 3’s roof indicates somewhere outdoors, the backgrounds all have a feeling of unreality. Their many symmetrical elements make them feel less like settings and more like very ornate decoration. This sense of grandeur is compounded by the extremely busy color schemes. They would feel overwhelming if the holy men weren’t depicted up close, occupying a significant amount of the painting. The intensely detailed backgrounds tend to draw attention to them by making their more consistent coloring stand out. The holy men sit cross legged, in a position often occupied by both Hindu and Buddhist deities.
In contrast to this, the outdoor Zen scenes (fig. 4,5 and 6) show scholars retreating into wilderness to meditate and be one with nature. The use of black and white creates a more muted color scheme, and their large swaths of open space place an emphasis on simplicity. Barely defined outlines cause elements to appear to blend, which creates a sense of almost impressionistic realism.
These two styles may seem irreconcilably different, but fig. 2 presents a transitional painting, with hints of both styles. The painting is ornate but set in an identifiably outdoor landscape setting. This dichotomy is conveyed through its depiction of the Lohans in color and the background in black and white.
These different styles provide a visual illustration of how Buddhism changed over time. While these shifts were taking place, Buddhist tenets were also being reimagined. Cosmic imagery and symbolism were increasingly used (as seen in the paintings from Bamiyan), and some followers began to regard the Buddha as a deity rather than a supreme teacher. These visual and religious changes all took place because of Buddhism’s success in new countries as it declined in India.
Suggested Reading
Fisher, Robert. Art of Tibet 1997.
Khan, Fazal A. Architecture and Art Treasures in Pakistan. 1. Publ. ed. Karachi: Elite, 1969.
Sherman E. Lee ; edited by Naomi Noble Richard. A History of Far Eastern Art. 5th ed. ed. Harry N. Abrams, 1994.
Sickman, Laurence and Alexander Soper. The Art and Architecture of China. The Pelican History of Art. 1. integrated ed. (based on 3. hardback ed.), reprint. ed. Vol. 10. 1978.