Mandalas are symbolic diagrams used to represent the universe within Hinduism and Buddhism. These diagrams have little medium restriction, appearing as cloth paintings, sand drawings, and even floor plans, to name a few examples. Used for meditation and other religious practices, they appear across a variety of cultures. However, this regional reach of the mandalas does not place them beyond comparison. Sometimes considered to be an idea that forms in all directions, mandalas are identified by their symmetry, colors, geometric patterns, and revolution around a central figure or point.
This chapter aims to examine a group of mandalas across several regions and time periods to highlight what intrinsic qualities allow them to feel cohesive as a collection yet distinctive as individual pieces. Additionally, this analysis will explore their architectural contexts, mostly through the lenses of spacial symbolism and shifts in the viewing experience.
Mandala of Manjushri
Ladakh, India
Description:
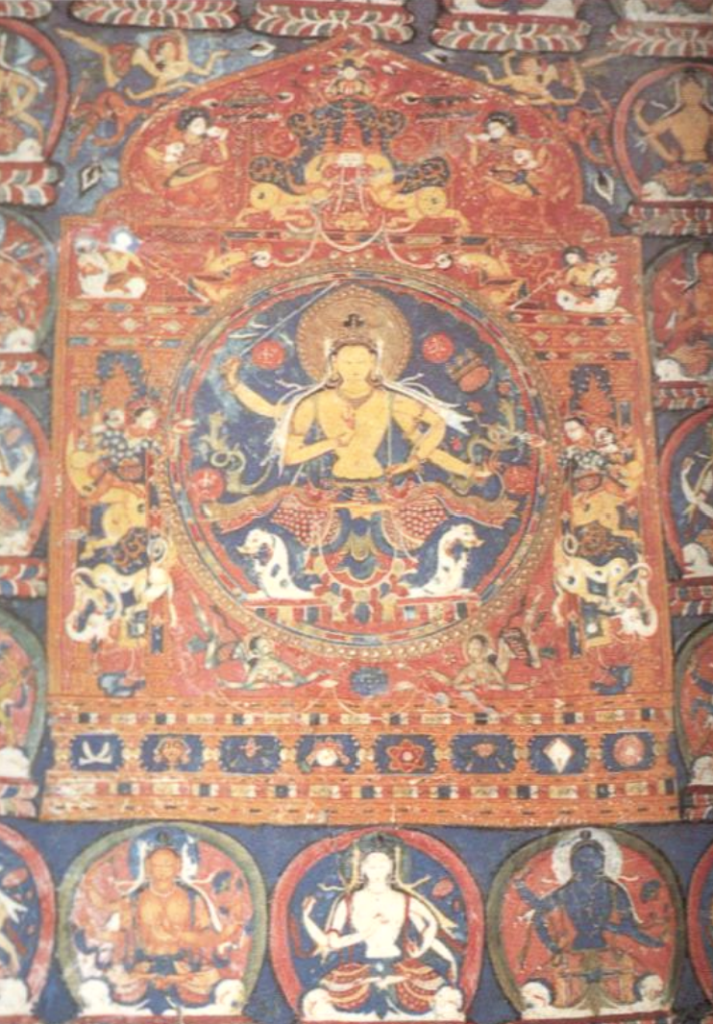
The Mandala of Manjushri is one painting among many within the Sumstek temple of the Alchi Monastery. In the late ’90s, this temple was considered to contain some of the best-preserved paintings of that period of Western Tibetan art (Fisher, 147).
This mandala is centered around the Buddhist figure Manjushri (fig. 1). Manjushri is a Bodhisattva–a term that may be understood differently depending on which branch of Buddhism it is interpreted under. Regardless, his depiction consists of bright yellows, reds, and white, which serve to strongly contrast the deep blue background he is placed before. The center ring of this mandala is the only section where blue is strongly concentrated. Several of the surrounding details contain blue, but those accents are small, especially in comparison to the inner ring. The remainder of the mandala is primarily a red-to-orange gradient, contained within the overall shape of a trilobed arch. The point at the top of the arch and the overall symmetry of the mandala truly emphasizes Manjushri’s spiritual significance and cosmic centrality. Even the accent piece behind his head has a clear point at its peak, strongly guiding the eye down a central axis.
Regarding this mandala’s context, the Mandala of Manjushri is one painting among many on the walls of the Sumstek temple. Visible along the mandala’s borders and continued across the other walls (fig. 2), the Sumstek temple has no designated end for the art within it. From the wall and ceiling paintings to niches with clay figures to even large floor statues, the entire temple is one continuous piece of art. Due to this, and the persistence of activity within the monastery, the mandala remains in its original context. Although remaining in the temple does not free the painting from possible change. The Sumstek temple was built around an atrium that leaves the ceiling open. This lack of coverage leaves the work inside vulnerable to elements like the rain which could destroy them over time. How these damages are handled, however, is up to the residing monks. Some may work to restore the old pieces, but others may prefer to cover the damaged work with a more contemporary replacement (Fisher, 148-150). So, as of the ’90s the Mandala of Manjushri remains true to its original piece, but this does not prevent it from experiencing modification in the future.

Image Source: Benjamin Rowland, “The Art of Central Asia” (p. 148)
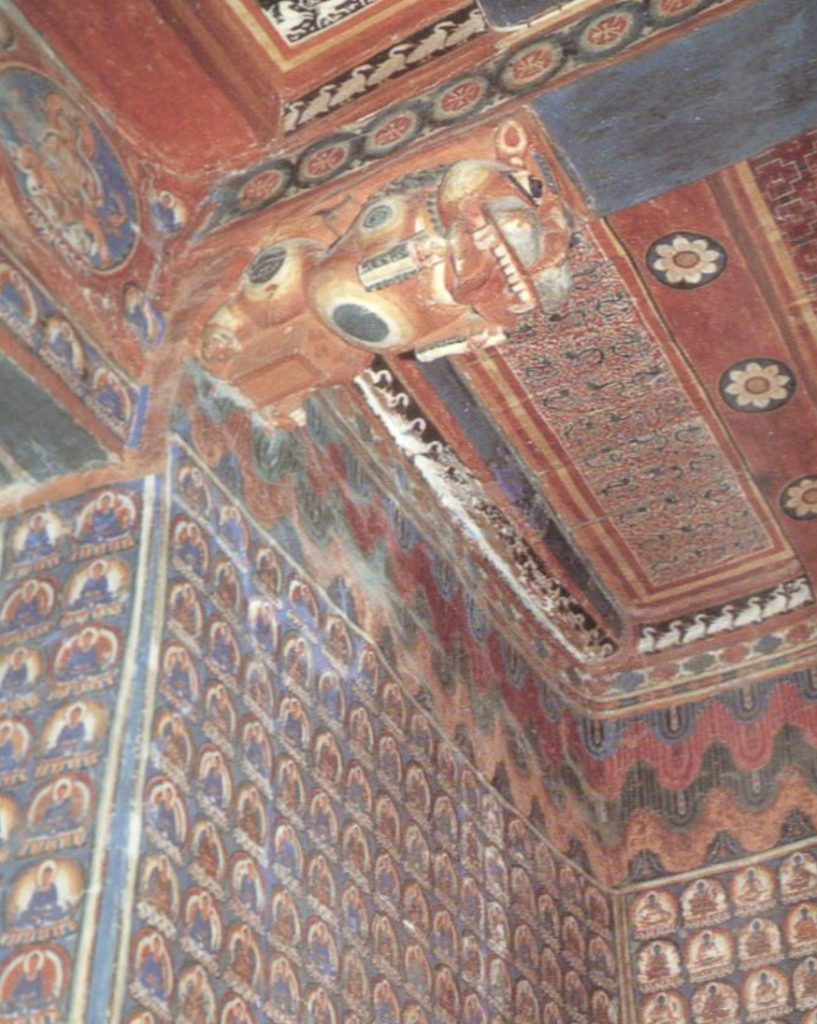
Image Source: Benjamin Rowland, “The Art of Central Asia” (p. 148)
Kakrak Cupola
Kakrak Valley, Afghanistan
Description:
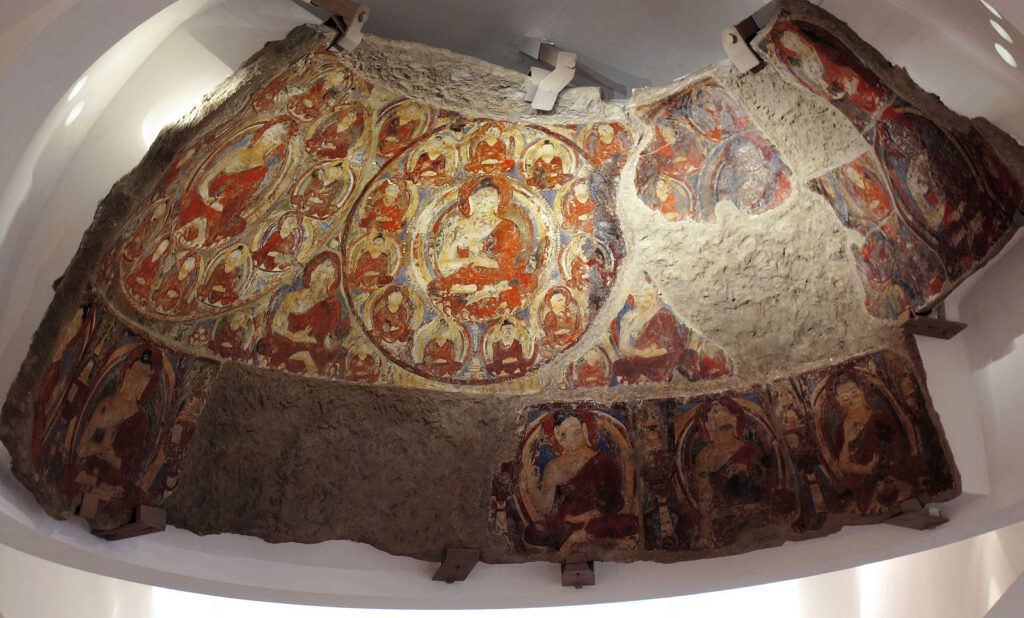
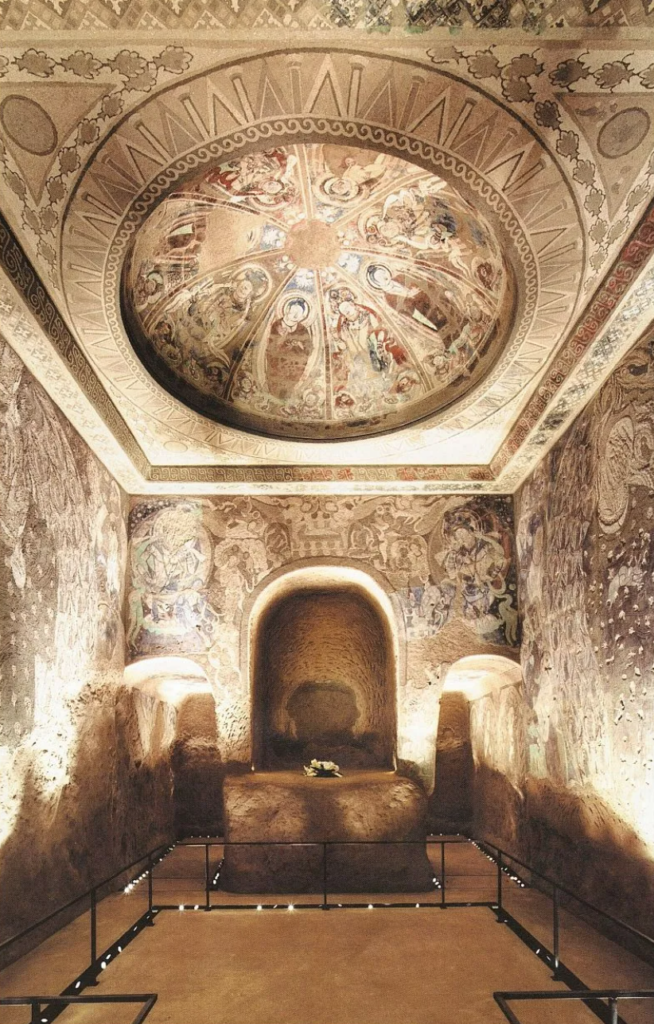
The Kakrak Cupola is a fairly damaged section of a dome from the Kakrak Valley. The fragment of a cupola contains three mandalas with other painted figures acting as borders connecting them (fig. 3). The mandala of focus for this chapter is the central, clearest image.
This manda depicts a large Buddha surrounded by eleven other figures. The color scheme consists most heavily of reds and white, although there are little splashes of blue between some of the figures. This mandala relies heavily on a circular motif. Each figure is circumscribed with a round border, the central figure sits before several looping halos, and the entire mandala is kept within a circle. This alludes to the piece’s connection to the celestial plane.
That celestial connection is interconnected with the mandala’s physical orientation. While there are no images of the cupola within its original context, its form as a dome still reveals plenty. This piece was intended to be observed from below, stationing itself above the viewer in both the literal and metaphorical sense. The circular motif–shapes that denote a connection through a resemblance to the sun–and the intended orientation of the cupola both situate the overall piece as holier and more connected to the cosmic plan than those viewing it. Unfortunately, its current context detracts from much of this experience. Since the cupola still appears to be kept on an elevated display, viewers will still be observing the piece from below. However, much of the art surrounding the primary mandala has been cut off or greatly damaged. The idea of continuity in sacred spaces, as seen in the Sumstek temple, has been forcibly halted.


Cave of the Ring-Bearing Doves
Kizil Caves; Xingjiang Region, China
Description:
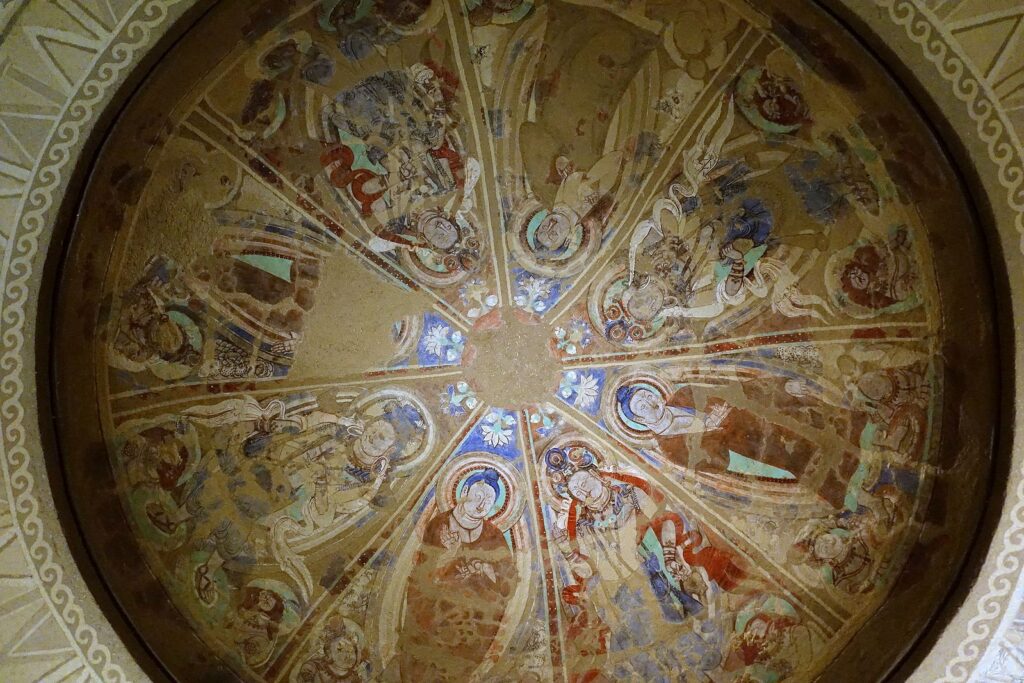
The Cave of the Ring-Bearing Doves is a dome originating from the Buddhist Kizil Caves. Unlike the other pieces within this collection, this mandala revolves around a central symbol (fig. 4). The sun functions as the center of this piece, its rays spanning out to divide the surrounding figures into eight triangular sections. The colors utilized lean more towards cool-toned shades but still feature red heavily in the garments and rays. The figures are thought to be four Buddhas and four Bodhisattvas, alternating evenly which each section. There is minimal background decor, but the blue background and layered halos strengthen the figures’ ties to the celestial center.
The Cave of the Ring-Bearing Doves is notably displayed in a reconstructed context in Berlin (fig 5). The dome was removed in its entirety and placed in an exhibition room that is both sculpted and painted to mimic the inside of a cave temple. This replication of the original context is able to preserve a large portion of the viewing experience. The viewer is able to walk into the room and trace the wall paintings with their eyes until they reach the dome’s center. This placement maintains the continuity, centrality, and celestial orientation that were integral to the dome’s original context. It is believed that this domical construction was intended to act as a symbolic reference to the ancient concept of the “Dome of Heaven,” and this recreation preserves some of that symbolism through its dedication to the original context. However, no new context is free from its own influence. It is not shared how the original cave was lit–if at all–but the museum arranged the exhibit’s lighting to run along the floor. Even though this decision does not detract from the core elements of the viewing experience, it is still something to keep in mind when considering the shift.

Thousand-Armed Chenresi
Tibet
Description:
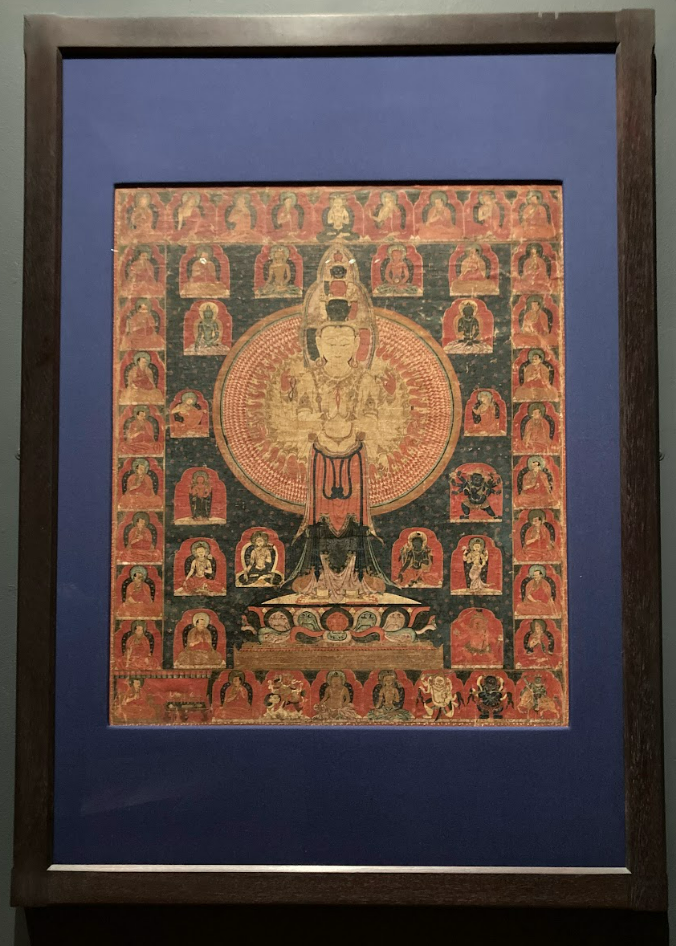
The Thousand-Armed Chenresi is a cloth mandala dedicated to the depiction of the Buddhist savior Chenresi (fig. 6). Chenresi is the cosmic form of the Boddhisattva Avalokiteshvara; he is known most immediately for his Boddhisattva will to refrain from reaching Nirvana for the sake of helping others reach enlightenment first.
In terms of the mandala’s intrinsic qualities, red, gold, and black dominate the color scheme. Chenresi is positioned at the center of the mandala, standing on a lotus throne. His thousand arms, all depicted with an eye on the palm, revolve around him within the constraints of two circular borders. The rest of the piece is contained in two rectangles. Various other figures fill the spaces between Chenresi and the borders. The composition of this mandala remains true to the ideas of central divinity and strong usage of geometric motifs, through Chenresi’s positioning and the repetition of trilobed arches behind every figure.
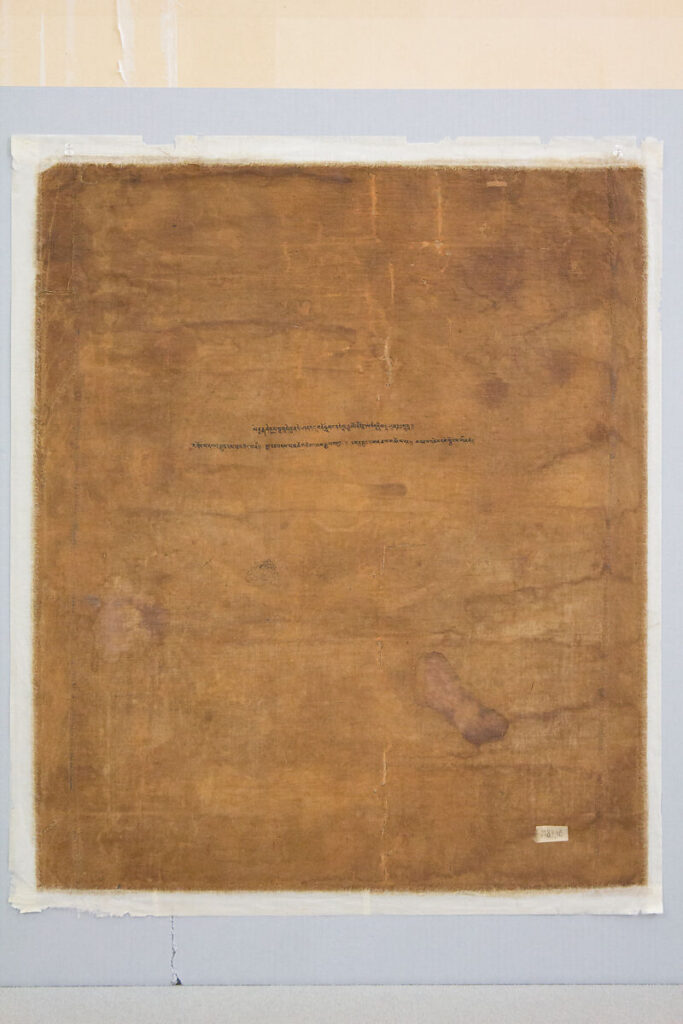
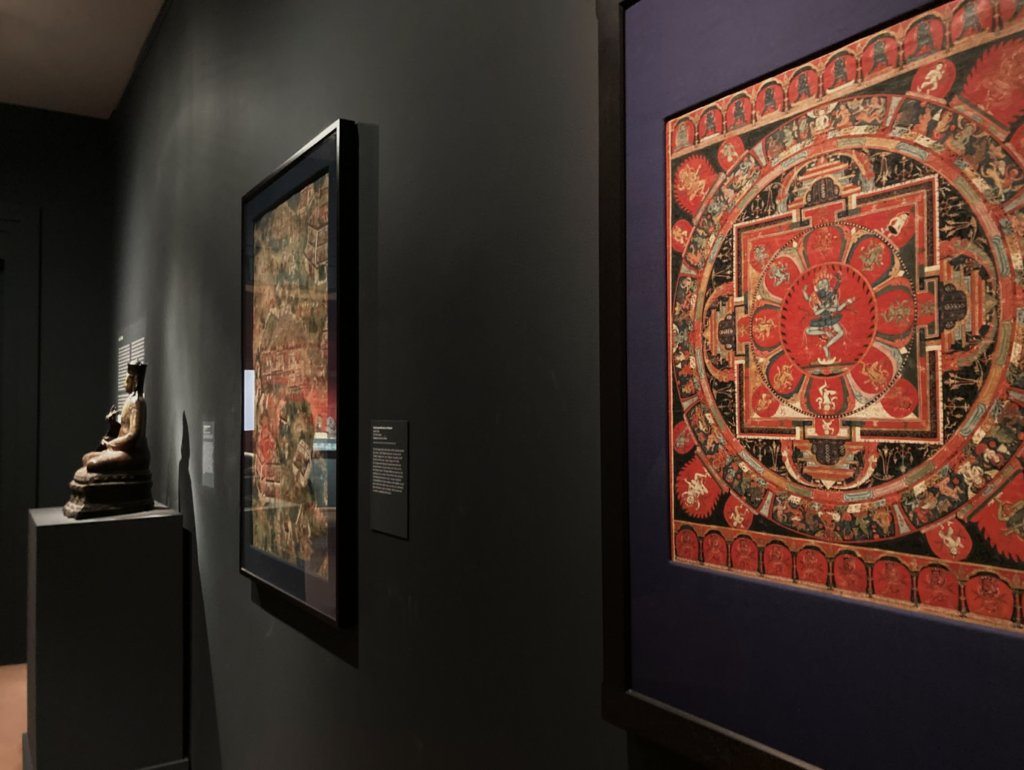
In regards to context, the Thousand-Armed Chenresi was purchased by its current repository in 1989. It is currently on display in the Metropolitan Museum of Art in a tall frame with a blue mat (fig. 7). It is kept alongside other pieces of art from Tibet and Nepal at a height that is generally eye level. The original context and intended viewing experience for this mandala are unclear. However, the museum’s display still leaves its own impression on the piece. The bright, overhead lighting casts its own influence on the viewing experience, but what is notable are the inscriptions along the reverse side of the mandala (fig. 8). Included in the mandala’s description but only visibly accessible through the MET’s website, an aspect of the overall piece is mostly lost in the framing. Although the inscriptions are brief, the contents–a charm-verse and praise of patience as a holy practice–build on to the story of the piece.

Hevajra Mandala
Tibet
Description:
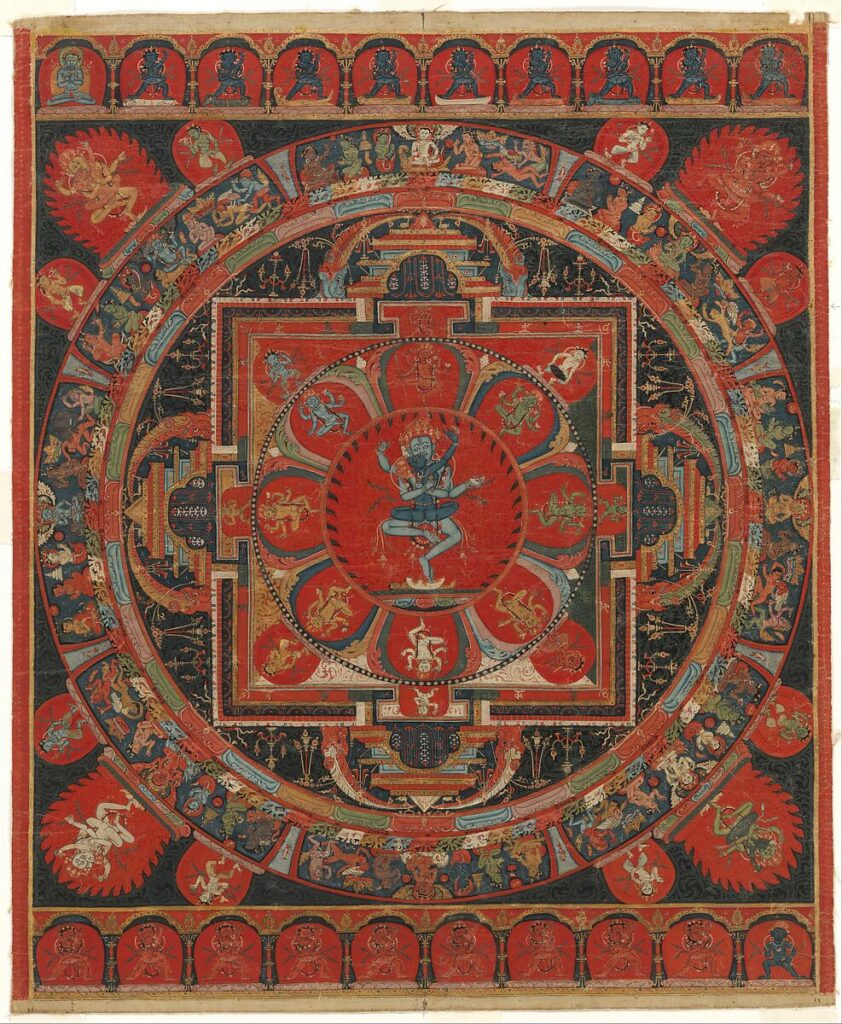
The Hevajra Mandala is a cloth mandala portraying Hevajra and his consort Nairatyma dancing together at the junction of four gates (fig. 9). These figures are sourced from the Hevajra Tantra text, which is revered by the Sakya tradition of Tibetan Buddhism.
In terms of the mandala’s intrinsic qualities, it contains an especially vast array of colors, covering the primaries among other shades of green and black. As mentioned before, Hevajra and Nairatyma are depicted at the center of four symmetrical gates and are further enclosed by two decorative circles. This positioning is meant to place Hevajra at the center of the cosmos. The rest of the mandala is rich with intricate details like other figures, swirling designs, tri-lobed arches, and various animals. There is a lot of texture and detailing to focus on, but Hevajra’s placement at the center of the mandala emphasizes his significance both in the scheme of the composition and the cosmic plane overall.
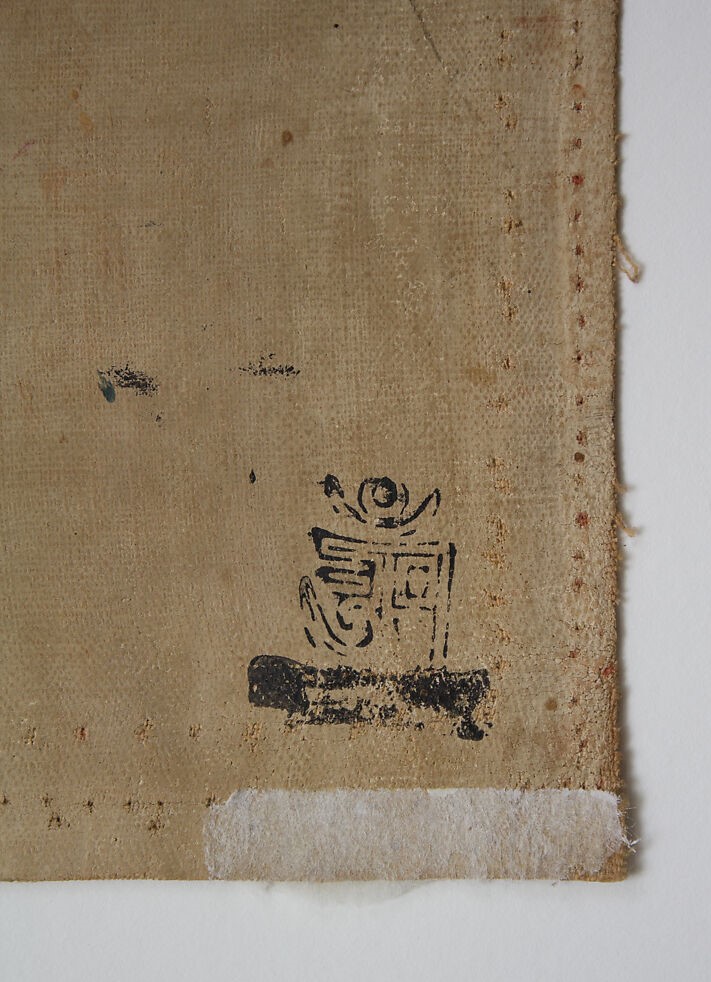
Much like the Thousand-Armed Chenresi, the information regarding the Hevajra Mandala’s contexts is limited to its current repository. The piece was gifted to the Metropolitan Museum of Art in 2015 and has since been placed in the exhibition room for the art of Tibet and Nepal. This mandala was also framed in the same black frame, blue mat format and hung at general eye-level (fig. 10). Once again, a piece of script on the reverse side is concealed by the framing (fig. 11). This piece of the script consists of a Sanskrit mantra that configures the syllables to resemble the silhouette of a stupa. It is another small detail in terms of the overall mandala, but it remains part of the piece that maintains the attention to detail displayed in the various elaborate motifs.

Overall, the pieces of this collection demonstrate unity through motifs while still showcasing their regional distinctions. Time and location often create division in art, but the form of focus has drawn everything together. In particular: centrality, cosmic orientation, symmetry, warm colors, and circular motifs are concepts that can be identified within each of these mandalas.
Additionally, each piece emphasizes the importance of context and how even the smallest changes can affect that. Through examining the contexts, both past and present, questions are raised about the continuity of art. Although the adjoining paintings are not usually considered to be the same piece, does that mean there is a defined end? Can there be a defined end in a space where the imagery keeps going? These questions, and any related ones that this chapter may invoke, could be answered by the end. However, these questions can also function as a lens through which to view exhibits and the impressions they create.
Works Referenced
Fisher, Robert. “The Development of Tibetan Styles (11th-14th Centuries).” In Art of Tibet, 125-64. Thames & Hudson, 1997.
“Hevajra Mandala.” n.d. The Metropolitan Museum of Art. https://www.metmuseum.org/art/collection/search/692123?deptids=6&ao=on&showOnly=openAccess&ft=Mandala&offset=0&rpp=40&pos=7.
Rowland, Benjamin. “The Chivalric Art of Kucha and Kizil.” In The Art of Central Asia, 151-74. New York, 1974.
———. “The Crossroads of Asia.” In The Art of Central Asia, 79-119. New York, 1974.
“Thousand-Armed Chenresi.” n.d. The Metropolitan Museum of Art. https://www.metmuseum.org/art/collection/search/37799?deptids=6&ao=on&showOnly=openAccess&ft=Chenresi&offset=0&rpp=40&pos=1